Friday, January 30, 2015

What's Your Slow Cooker Doing Besides Cooking Slowly?

Yum
Cuisinart 3-in-1 Cook Central, slow cooker cooking food recipes
Cuisinart 3-in-1 Cook Central

Last year was a record year in slow cooker usage in my household.  It was also the year I went through two slow cookers.

The first slow cooker I'd had about a year and a half and midway through last year it died. There is nothing worse than coming home to a cold slow cooker and having to throw out the entire batch of food ... especially when it's lamb.

The second one lasted all of six months max.  Both were from the Crock Pot brand which I've never had problems with at all in the past. In fact, the one prior to the last two, I'd had for over 10 years.

But I have to confess ... secretly I was a little happy the slow cooker broke.  Why? I'd had my eye on two slow cookers in particular.

The All-Clad Deluxe Slow Cooker with non-stick cast-aluminum insert you could use on the stove top to brown foods before slow cooking. The fact that I had to move the insert to the stove top to brown was a turn-off for me. But the All-Clad brand made it a contender.

Or the Cuisinart 3-in-1 Cook Central, a combination cooking unit, which works as a slow cooker, a somewhat very deep electric "skillet" and a steamer. In the slow cooker function you can program it to cook at high, low, simmer or warm AND my favorite feature you can brown/sauté your food before slow cooking right in the slow cooker. Temperature can be set from 175 to 400 degrees.  The insert is non-stick, it's not as heavy as the conventional ceramic inserts, and best of all it's easy to clean.

After reading reviews, about the feature and the practicality of each appliance I decided on the Cuisinart. I put it on my Amazon wish list, crossing my fingers that someone might get it for me. And, of course, that someone turned out to be The Hub. It was one of my Christmas presents and boy did I do the happy dance when I saw it!

It is now over a month old and I've been using it 3 - 4 times a week. I can say that I made the right choice for me.

So far ...
  • I've used it as a slow cooker
  • I've used it to brown food before turning on the slow cooker function and it really browns nicely
  • I've used it to brown/sauté and simmer food that was ready in 30 minutes or less - told you it's like an old-school electric skillet  ... only better
  • I've steamed vegetables, fish and mussels
  • I've used it to heat up these two soups from a frozen state and it was faster than in the microwave, plus you can switch it to warm to keep your food warm till you are ready to eat
  • Mostly kept it out on the counter because I find I am using it as more than just a slow cooker
If you are in the market for a new slow cooker, you might want to consider the
Cuisinart 3-in-1 Cook Central. For about $150 you get an appliance that has more than one use/function. That's a big plus in my book!

I want to make it clear, that I am not being paid or compensated in any way to write this post.  I just wanted to share my personal opinion and experience with this particular unit. I use both brands, Cuisinart and All-Clad, at home, no preference for either brand skewed my opinion.

NOTES: I was not able to link the All-Clad unit directly to All-Clad because they do not carry it nor show it on their site.

Wednesday, January 28, 2015

Where's Wednesdays with Eryka?!

Yum
Relax folks! I've given Eryka the week off because it's her birthday week. She and her boyfriend, Mike, have a trip planned to Disney World to celebrate the coming of her 27th year! It's an all out trip with a fun character breakfast and fancy dinners at Epcot's World Showcase. I know they will have a great time. So Happy Birthday to my sugarplum, Eryka!

While she's out I'm sharing one of her top most viewed, liked and shared recipe and of course it's a dessert!

Banana Nutella Pastry Dessert Puff Baked


Banana and Nutella Pastry Bundles, only four ingredients and so easy to make, but they look so impressive!  If you are hosting a SuperBowl party this Sunday, serve these.  Just be sure to make a double batch, because your guests will want more for sure!

Recipe:

  • 1 puff pastry sheet, thawed
  • 1 banana, sliced in 1/2 inch pieces, 9 pieces total
  • 9 teaspoons of Nutella
  • 1 egg, beaten

1. Thaw the puff pastry until you can easy handle it. Pre-heat the oven to 400 degrees.

2. Lightly flour your work surface and place your puff pastry down to cut it into 9 squares (remember to not worry about being perfect, it's ok!).

3. In each square, place a teaspoon of nutella topped by the banana slice. Brush the egg along each edge. Take each opposite corner and press tightly together. Repeat to all pastry pieces.

4. Place the pastries on a baking sheet and brush all over with the egg for the extra golden color when baking. Bake for 15 minutes or until golden in color.

5. Place on a cooling rack when done for about 5 minutes then enjoy!

Monday, January 26, 2015

Slow Cooker Turkey Meatball & Brown Rice Medley Soup

Yum
Slow Cooker Turkey Meatball  Brown Rice Soup


I am going on record by saying that I have never really liked soups with rice in it.  Until now that is.

I recently went to Trader Joe's to pick up a few things, but actually left with four bag fulls of groceries (tell me that happens to you too...  please!).

One of the items I picked up was Trader Joe's Brown Rice Medley. The medley consists of  long grain brown rice, black barley and daikon radish seeds. Here's a picture of the package ====>

Then the light-bulb in my head went off ... add it to the soup you are making tomorrow ... that light-bulb said. And I did, I didn't even hesitate, even knowing that I don't like rice in my soup and the soup turned out to be far more than delicious, it was extraordinary.

You see, I had made this soup before and yes, it was delicious but this addition took it to the next level.

The different rices and grains added that extra texture that this soup needed.

Now, I know not everyone has a Trader Joe nearby but you can make your own medley by adding a 1/4 cup of brown rice, 1/8 cup of wild or basmati rice, 1/8 cup of red quinoa and an 1/8 cup of white quinoa, barley or whatever other rice, seed or grain you may have. This is a great way to use up those small bits of rice or grain you have left that really won't amount to much if you cook it on its own.

Here's the best part, this recipe makes enough to freeze the leftovers (and it freezes well) for another day.  I love recipes like that ...

For the meatballs:
  • 1 tablespoon olive oil
  • 2 shallots, finely chopped
  • 1/2 bell pepper, finely chopped (use whatever color pepper you prefer or have on hand)
  • 1/2 teaspoon minced garlic
  • 1 pound ground turkey 
  • 1 egg beaten
  • 1/2 cup breadcrumbs
  • 1/4 cup grated parmesan cheese
  • Salt & pepper to taste
  1. Preheat oven 375 degrees.
  2. Heat a skillet over medium heat, add oil followed by shallots and green peppers.  Sprinkle lightly with salt to help release the juices.  Cook 5 minutes or until softened, add garlic, cook another minute. Set aside to cool.
  3. Mix the remaining ingredients in a large bowl. Add in the cooked vegetables, mix well to incorporate.
  4. Shape into 1" meatballs and place on foil or parchment lined lipped baking sheet.
  5. Bake 15-20 minutes. Halfway through cooking time flip meatballs so that they brown on both sides.

For the soup:
  • 1 tablespoon olive oil
  • 4-6 medium carrots, peeled and sliced on the diagonal
  • 1/2 head of green cabbage, cut into medium to large wedges
  • 8oz frozen pearl onions
  • 8 cup chicken stock
  • 1 cup white wine
  • 1 cup uncooked brown rice or Trader Joe's  
  • Leftover Parmesan rind (optional)
  • Salt & pepper to taste
  • 1 - 10oz package of frozen spinach, defrosted and squeeze out all the extra liquid over a bowl (throw that liquid into the soup). Keep spinach wrapped in paper towel in the fridge.
  1. Heat a large sauté pan over medium high heat. Add oil followed by the carrots and cabbage.  Cook until the cabbage is cooked down to half its volume and the carrots a just barely browned. 
  2. Add pearl onions and cooked for 4 minutes. Lower heat if needed to avoid burning vegetables.
  3. Transfer all the vegetables to the slow cooker.
  4. Add the meatballs and the remaining ingredients, except for the spinach, to the slow cooker.
  5. Set slow cooker to low for 8 hours.
  6. Ten minutes before serving break up spinach and stir into soup to warm through.
Serve with your favorite thick and dense bread of choice.  Enjoy!


Recipe Notes: 

For the meatballs you can either set them aside to use immediately or let them cool to room temperature, bag in zip bag and store in fridge (no more than 3 days) or freeze until you are ready to make the soup.
You can skip steps 1 and 2 of the soup preparation and just dump the carrots, cabbage and onions into the cooker.  I prefer making it as described because I feel it adds a layer of depth of flavor to the vegetables and the soup.
Why the Parmesan rind?  Extra flavor and body to the soup. It's optional but if you have one throw it in.  Don't go out and buy a hunk of Parmesan just for this. And if you don't save the rinds (put 'em in the freezer in a zip bag) ... start doing so! Do you eat it? Some don't ... I do. It's the chef's treat, just for me.


Friday, January 23, 2015

Spicy Sweet Thai-Inspired Grilled Chicken

Yum

Spicy Sweet Thai Grilled Chicken Soy Ginger

Being in Florida the grill is accessible year-round but I especially like using it in the "winter" months because the weather is just perfect for outdoor grilling.

Seriously, it's a miserable thing to be grilling in the humid 98 degree Florida heat.

Anyway, I'll be making my Spicy Sweet Thai-Inspired Grilled Chicken again this weekend, since we are looking at some "cooler" temperatures heading our way.

  • 1 tablespoon minced garlic
  • 3 tablespoons soy sauce (low sodium)
  • 1/2 teaspoon fish sauce
  • 1 tablespoon grated ginger
  • 1 teaspoon Thai red chili paste
  • 1 teaspoon lemongrass powder
  • 1 tablespoon honey
  • 1/8 cup rice wine
  • Salt & pepper
  • 2 large skinless/boneless chicken breasts*, butterflied
  1. Mix the first eight ingredients together. Salt and pepper the chicken breast, place in zip bag or glass bowl.
  2. Add marinade to chicken. Allow it to marinate from 4 - 24 hours.
  3. Remove chicken from marinade and dry each piece
  4. Heat the grill to a medium high, about 10 minutes or so.
  5. Spray the grates with non-stick spray (take care of flare-ups) or wipe them with a paper towel soaked with canola oil.
  6. Place chicken on the grill. Do not attempt to move the chicken for at least 5 minutes. Then move them a quarter turn to get nice hatch marks. Grill for 1 minute.
  7. Turn over and allow to grill for another 4-5 minutes and turn a quarter turn to get hatch marks. Grill for an additional minute. Check for doneness.
  8. Have a big sheet of foil ready.  
  9. Place chicken in foil and wrap tightly. 
  10. Allow to rest 3-5 minutes.

Serve with grilled vegetables or salad and a crisp white wine. ENJOY!

Recipe Notes:
*I highly recommend that you brine your chicken before it hits the grill.  Learn how here.

Wednesday, January 21, 2015

Lentils with Turkey Kielbasa

Yum
Lentils Turkey Kielbasa Soup Potato Sweet potato

Lentils and kielbasa are two things I completely enjoy, so for this recipe I am combining both! Lentils are very filling, hearty and comfort food to me. I enjoy making recipes with lentils or split pea because it makes all my senses happy and after a long day at work on my feet I want comfort food, plus leftovers! Lentils is great for a filling dinner paired with rice or keeping it lighter by eating it simply as a soup with your favorite bread. It makes plenty for dinner and then my favorite: leftovers! The Goya Azafran seasoning packet is completely optional. If it is not available in your grocery store you can omit it or add your own spices. If you do omit the packet make sure to add salt; I always add salt at the end of these kind of soups since I add the seasoning packet and it tends to be salty on its own. I hope you enjoy another one of my comfort go to foods!

Recipe
A Wednesdays with Eryka
Recipe
  • 1lb turkey kielbasa, sliced into coins
  • Olive oil
  • 1 onion, chopped
  • 1 bell pepper, chopped
  • 3 cloves of garlic, minced
  • 1 teaspoon cumin
  • 1 packet Goya Azafran seasoning
  • 1-16 ounce bag lentils
  • 1 cup white wine
  • 5 cups water
  • 1 bay leaf
  • 3 sweet potato, chopped in chunks
  • 3 russet potato, chopped in chunks
  • salt and pepper, to taste

1. In a large stock pot, heat olive oil on medium heat and add the turkey kielbasa. Cook until slightly browned on both sides. Remove from pot.

2. In the same pot, add a little bit more olive oil plus the onion, pepper and garlic. Cook for about 4 minutes until fragrant and slightly soft. Add the kielbasa back into the pot with the vegetable mix. Stir together and cook for about 1 minute.

3. Add in the cumin, lentils and Azafran seasoning packet. Stir to combine all the ingredients for about 1 minute. Add in the liquids (the amount varies, just make sure it is about 2 inches above the lentils) and bay leaf. Stir it all together then bring to a boil. Simmer on low-medium heat for about 45 minutes.

4. In the last 15 minutes of cooking, bring soup back up to a boil and add the potatoes. Lower to simmer over low heat and in the mean time, if you are accompanying with rice, make it at this time.

5. Once 15 minutes have passed check to see if the potatoes are soft with a knife or fork. If it is then it is ready to eat. Add salt and pepper to taste if needed. Serve and enjoy!

Monday, January 19, 2015

Sauteed Achiote Chicken & Cauliflower

Yum
Nicaraguan Recipe Chicken Cauliflower Achiote Paste Hispanic Food


I have an ongoing obsession with achiote paste, which is a seasoning mix made and extracted from the annatto seed.

It is used extensively in Central American and some Asian dishes.  I developed my recipe for achiote paste based on the paste used to season Nicaraguan dishes.  I've noticed the actual achiote paste starting to populate the shelves of some mainstream supermarkets in the Hispanic foods section, so you may even be able to buy it off the shelf.  Personally, I prefer either making it myself or going to my local Nicaraguan "mercadito" (market) and buying it there.

Aside from the beautiful red color it imparts on foods, it adds a deep rich, earthly flavor to proteins (yes even tofu!). I find this is especially true on grilled meats such as chicken, pork, beef even seafood.

But I wanted to take it indoor and use it in a sauté for a quick dinner. And the results were simply put deeeeelicious! The Hub had seconds and took leftovers to work the next day.

  • 1 pound sliced chicken breast** - 2" strips (like you'd use in a stir-fry)
  • 2 tablespoons canola or nut oil of choice
  • 1 tablespoon Achiote Paste
  • Juice and zest of a small lemon
  • 1 teaspoon of ground cumin powder
  • 1 teaspoon garlic powder
  • Salt & pepper, to taste
  • 1/2 cup white wine
  • 1 medium onion diced
  • 4 mini sweet peppers or one medium red or orange pepper
  • 1/2 head of cauliflower broken down into florets
  1. After brining** your chicken (optional), place all the ingredients except oil and onion in a zip bag and allow to marinate 8 hours or best overnight. Take out of the fridge,  Remove chicken pieces from marinade shaking off excess liquids as you remove. Set marinade aside, do not discard it. Blot chicken on paper towels and allow to come to room temperature.  
  2. Heat large skillet over medium high heat, add 1 tablespoon of the oil.
  3. Add 1/2 the chicken pieces - do not over crowd pan - brown chicken lightly. Remove and place on plate while you cook the remaining pieces in remaining tablespoon of oil.
  4. Lower heat to medium and add onions and peppers to pan. Saute for 3 - 5 minutes or until softened and lightly browned.
  5. Add cauliflower and saute for an additional 2 minutes.
  6. Place all the chicken back into the pan and stir to blend with cauliflower.
  7. Add reserved marinade liquid and bring to a boil over high heat.  Allow to boil for 1 minute.
  8. Lower heat to low and simmer for 12-15 minutes or till chicken is cooked through.
Serve with fluffy white rice, sweet plantains and an ice cold beer. Enjoy!

**Recipe Notes: You can find brining instructions here or you can skip the brine step altogether. I just have a habit of brining chicken when I use breast meat. It really helps keep it juicy.


Friday, January 16, 2015

Roasted Baby Yukon Potatoes with Parsley & Dill

Yum
Roasted Yukon Potatoes Herbs Parsley Dill

Roasting any vegetables makes then delicious but there is something about roasted baby Yukon potatoes that goes above and beyond the word delicious. Add a small touch of butter and a hand full of fresh herbs and you've hit gold.

That's what this recipe is ... golden little orbs, perfectly roasted to creamy tenderness.

Yeah, they are that good.  And they are so incredibly easy to make ...

Serves 2-4


  • 1.5 lb bag of baby Yukon  potatoes
  • Olive oil
  • Sea salt
  • Pepper
  • 1 tablespoon butter, cubed
  • Palm full of fresh Italian parsley, chopped
  • 4-6 fresh dill fronds, chopped


Preheat oven to 450 degrees
  1. Wash and dry potatoes, do not peel,
  2. Slice in half, lengthwise
  3. Place potatoes on a foil-lined, baking sheet
  4. Drizzle oil over potatoes to coat - mix with your hand to evenly coat
  5. Sprinkle with salt and pepper to taste
  6. Roast 20-25 minutes, turn them over half way through the cooking time
  7. Place hot potatoes in a serving bowl
  8. Add cubed butter, stir to melt
  9. Stir in fresh herbs.
Serve with your favorites side of protein or add a salad and make it a meal. Enjoy!

See wasn't that easy?

Wednesday, January 14, 2015

Spicy Turkey Kielbasa Alfredo Pasta

Yum
Kielbasa Turkey Pasta Spicy Alfredo Sauce Cheese

Pasta, how I love thee. It is safe to say I'm a big pasta lover so I present to you another delicious pasta dish! This is a great dish for the weekend; it is also great for a get together since there is enough to go around. I do recommend to make this during the weekend rather than during the week because even though it is an easy recipe there are a lot of steps. Make it on a Sunday night to have left overs for 2 days! Now when a recipe calls for cheese I always believe more is... more! I like adding a lot more cheese than I ever read in recipes or even in my own recipes. The texture cheese leaves plus the taste you just can't go wrong. My boyfriend gave me the biggest compliment with this dish, the night I made it he told me this is a definite repeat recipe! It is important to cook the sauce in the same pan the kielbasa was cooked for depth of flavor. The pasta shape is up to you but I do recommend a pasta that has ridges such as penne, corkscrew or rotini so that the sauce and all that lovely cheese adheres to every bite. I hope you enjoy this recipe for it has become a new staple in my home!

Recipe:
A Wednesdays with Eryka Recipe
1lb Turkey Kielbasa, 1 inch slices
Olive oil
1 box corkscrew pasta
3 tablespoons butter
3 cloves of garlic, minced
3 tablespoon flour
1 cup chicken broth
2 cups half and half
1/2 teaspoon salt
1/4 teaspoon pepper
1/4 teaspoon cayenne pepper
1/4 teaspoon red pepper flakes
1/2 cup Parmesan cheese
2 cups Mozzarella cheese

1. In a sauté pan, heat olive oil to a medium heat then add the kielbasa. Cook until browned on both sides. Set aside once browned.

2. Cook pasta according to package directions.

3. While pasta is cooking, in the same sauté pan the kielbasa was in, melt the butter then the flour. Add the garlic and cook for about 2 minutes or until fragrant.

4. Wisk in chicken broth until smooth followed by the half and half one cup at a time. Add the salt, pepper, cayenne and red pepper flakes. Simmer until sauce is thickened.

5. Add the parmesan cheese with 1 cup of mozzarella into the sauce and stir until smooth.

6. Preheat broiler. Add the kielbasa into the sauce followed by the cooked pasta. Stir until combined. Pour pasta mixture into a 9x13 baking dish. Top with remaining mozzarella.

7. Broil until cheese is melted and bubbly. Serve and enjoy!

Monday, January 12, 2015

Mediterranean Inspired Cavatappi Pasta with Roasted Vegetables

Yum
Cavatappi Pasta Roasted Vegetables fresh herbs feta

When you are into the winter months and perhaps tiring of all the heavy comfort foods, soups, stews and want a light spring-like meal, consider my Mediterranean Inspired Cavatappi with Roasted Vegetables.

The dressing for this pasta is light and flavored with garlic, zesty lemon and fresh herbs and can be prepared ahead of time.  In fact, it's best that it sit overnight to let the flavors develop. You can even make the veggies a day or two ahead. Then all that's left is mixing everything into the hot pasta and dinner or lunch is ready.

You can easily expand this pasta dish by adding grilled chicken or serving it alongside of your favorite grilled fish.

Serves 4

Dressing:
1 cucumber - seedless, diced
1 teaspoon finely minced garlic
Half a palm of parsley
Zest of one lemon, finely minced
Juice of one lemon,
2 tablespoons white balsamic vinegar
1/2 cup olive oil
Salt & pepper, to taste

Handful of basil, rough chopped
A sprig of mint, rough chopped
3 campari or plum tomatoes, cut in wedges

Place the first 8 ingredients into a jar or zip bag, gently shake to mix. Set aside in fridge for a few hours and allow the flavors to develop. Best over night.

Roasted Vegetables:
3 - 4 - Bell peppers - variety of colors - cut in wide strips
1 - large eggplant, large dice
Olive oil
Salt & pepper

Preheat oven at 375 degrees, drizzle with olive oil and sprinkle with salt and pepper. Roast till veggies are lightly charred about 30-45 or till desired doneness. You can remove the skins of the peppers by placing in plastic wrap for a few minutes and peel them off.  I don't bother because I don't mind the skins.

Pasta:
1 pound cavatappi or corkscrew pasta
Cook pasta according to package direction.

Topping:
Feta cheese, to taste and crumbled over each serving

Bring it all together:
Place hot pasta in a large bowl, add the roasted vegetables, dressing, basil, mint and tomatoes. Mix everything together.  Crumble feta cheese over each serving.

Enjoy!

Friday, January 9, 2015

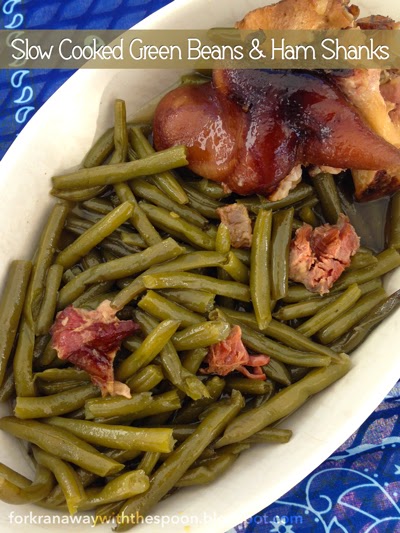
Slow Cooked Green Beans & Ham Shanks

Yum
Slow Cooker Recipe Green Beans Ham Shanks Ham Hocks


To me green beans symbolize the holidays, a special ocassion, a celebration, whatever the moment, they are a classic favorite of mine.

I prepare them in so many different ways but hand-down this is my family's favorite way to enjoy these little green wonders.

The key to making this recipe a success is slooooooooow cooking - ten hours worth of slow cooking. Don't try this on the high setting of your slow cooker, the flavor just doesn't compare.

Even though they are simmering away along with meaty ham shanks and smoked ham hock, the green bean flavor is not lost, on the contrary it is enhanced. It's richer, deeper and so incredibly savory.

The best part? Everything gets chucked into the slow cooker, that's it. Nothing more to do than sit back and let the cooking aromas tantalize your taste buds all day. And really how bad can that be?

Give it a try, I think you'll make these green beans a part of repertiore!

2 - 3 pounds fresh green beans, ends trimmed *
1 big meaty piece of ham shank or two medium pieces
1 smoked ham hock, scored
1 large onion, chopped
1 head of garlic, crushed, no need to peel**
2 quarts of ham stock (substitute with chicken stock if not available)
Salt** and pepper to taste


  1. Place all the ingredients in a slow cooker.
  2. Set for 10 hours on low. (Do not use the high cooking temperature, the results are not the same)
  3. Shred ham hock and shank.
  4. Remove the garlic or slip the peel off and throw back into the green beans
  5. Enjoy!


Serve with anything but especially delicious with a down home southern meal of fried chicken, mashed potatoes and cornbread.  Fish out the garlic head** or leave it in and serve with the green beans.  I've been known to have this dish on its own as meal with just a wedge (or two) of cornbread to soak up the juices.

Recipe notes:  If you have juices left over, DON'T throw them out! Use them to make another batch or save them to use when you make a batch of split peas or any bean for that matter! The juice freezes well in zip bags.
** Go easy on the salt, since the shank and hocks are fairly salty. Check for seasoning halfway through cooking time and adjust if needed. You can either remove the garlic head and discard (terrible thing to do!) or  gently squeeze out the paste and mix back into the green beans (a great thing to do!).

Wednesday, January 7, 2015

Cuban Franks with Yellow Rice - Arroz con Salchichas

Yum

*A Wednesdays with Eryka Recipe*

Franks with yellow rice Arroz con Salchichas ( salchichas pronounced sal-chee-shas) is an old school Cuban recipe that is so easy to make it is almost unbelievable!

This recipe is a throw back to what a typical Cuban housewife would of made (back in the "old-school days") if she had nothing in her pantry but white rice, some azafran (saffron), Vienna sausages and maybe some stock. It's kind of the equivalent of making spaghetti with "souped-up" jarred sauce, because that's all there is in the pantry.

Wednesdays with Eryka
Classically the recipe calls for Vienna sausages but seeing as how I have a bad relationship with Vienna sausages, from over eating them when I was a kid, I put my own twist by using turkey franks. I also add green beans, an ingredient my co-worker told me she adds to hers. It is literally a one pot meal and it is so good!

Recipe:
2 tablespoons olive oil
1 -  8 oz bag yellow rice with saffron
4 turkey franks*, sliced in 1/2 inch pieces
1/2 cup green beans
2 cups water* (or as indicated on rice package)

1. In a pan, heat the olive oil on medium-high heat. Pour in the rice with the seasoning. Brown the rice for about 5 minutes, stirring frequently. If needed, lower heat to medium to keep the rice from burning.

2. Add in the franks and the green beans and brown all together for about 2 minutes.

3. Add the water, stir and bring to a boil. Lower to a simmer; simmer for 20-25 minutes depending on how dry or mosit you'd like your rice.

4. After 20-25 minutes, check the rice to your liking, stir and serve. Enjoy!

Serve with bread and a simple salad of iceberg lettuce, tomatoes and cucumber with a drizzle of olive oil and vinegar. Now your talking ... old-school Cuban dinner.

*Recipe Notes:
Want to try it the original way, use two cans of Vienna sausages and cut each in thirds, saute as directed in step two.
Added more flavor by using chicken or beef stock to the rice instead of water.


Monday, January 5, 2015

Leeks, Parsnips & Coconut Soup

Yum

The first official post of the year and after a long hiatus from the blog because of a four month battle in getting our computer issues resolved.  But resolved they are and I am so happy to be back and blogging. What better way to start the year with a delicious, nutritious and warm soup...

A recent trip to Trader Joe's inspired this yummy, warming soup of leeks, parsnip and coconut!

It's perfect as a main meatless meal when paired with a light salad or as a starter to dinner. Parsnips are often overlooked in the veggie aisle and I think that is such a shame. It's a super versatile veggie! If you are watching your carb intake, parsnips are a great substitute for mashed potatoes, personally I prefer them to the usual cauliflower substitution.

As to health benefits, well 1/2 a cup of parsnips serves up 3 grams of  dietary fiber, 45 micrograms of folate, 6% of the RDA* of potassium, and 13% of the RDA of vitamin C.

But really, I just love their subtly sweet, earthly flavor. Paired with leeks (known for their vast quantities of vitamin A and K), garlic, ginger and coconut milk, you not only have a tantalizingly delicious soup, you are also honoring your body with a healthy treat.

I hope you get around to trying my Leeks, Parsnips & Coconut Soup recipe and enjoy it as much as the Hub and I did.

Serves 4 served as a main meal, 8 as a starter.

1 tablespoon olive oil
1 pound leeks, sliced into half inch medallions
1 large sweet yellow onion, sliced into half moons
1 tablespoon butter or coconut oil
1/2 teaspoon minced garlic
1 tablespoon grated fresh ginger
1 pound parsnips, sliced into 1/4 inch coins
1 quart of chicken or vegetable stock
1 cup white wine
1/2 cup of water
1 14 ounce can of light coconut milk
1/2 teaspoon dried thyme
Salt & pepper to taste
Greek yogurt - lowfat


  1. In a deep soup pot (such an enamel cast iron dutch oven) heat olive oil over medium heat.
  2. Add leeks, onion and a pinch of salt to pot. Saute for about 5-7 minutes or until leeks/onions are tender. 
  3. Add butter or coconut oil.
  4. Stir in garlic, ginger and parsnips to the onion mixture and saute for 5-7 minutes or until parsnips start to take on a slight golden color.
  5. Add all the remaining ingredients except yogurt. Cover.
  6. Simmer on low 10-15 minutes or until parsnips are tender. Stir ocassionally.
  7. Remove about 1/2 to 1 cup of onions and parsnips, set aside.
  8. Using and immersion stick or a blender, blend soup until thick and creamy and all vegetables have been incorporated.
  9. Add reserved vegetables back to the soup. Gently stir through.

To Serve:
Ladle into deep bowls, add a dollop of yogurt. Serve alongside a warm loaf of crusty bread and a light salad. Enjoy!

*RDA=Recommended Daily Allowance